Rice Paper
Home

Scroll Mounting
What discusses here are basic techniques of how a traditional wall scroll in East Asia are made by hand.
Equipment
- 10 ft. x 40 ft. paper board
- 2 ft. x 9 ft. cutting board
- 3 in. x 9 ft. wood ruler
- 2 Needle awls
- Bamboo knife
- 10 x 14 in. paste paper
- Waxing stone
- Paste brush
- Coir brush
- Cutting knife
- Steel rule
- Tweezers
- Sieve
- Watercolor brushes
How to
- Supporting an artwork. 1. Make a soft dough from wheat flour. Wash the starch out. Filter the starch into a pail through a fine sieve. Wait two days to let the starch settle hard. 2. Train the unwanted water. Pour boiling water AT ONE GO on the starch and stir it hard. The finished paste should appear milky. 3. Supporting an artwork requires thin paste. Break the paste chunk in water, then filter the paste through a fine sieve. 4. The supporting paper should be smooth, unsized, extend 1 and 1/4 inch beyond the edges of the artwork. Place the artwork face down and sprinkle lightly with water to let it stretch. Brush a thin, even coat of paste to the back of the artwork with a soft, wide paste brush. Apply a little pressure to smooth out any uneven, wavy spots. Spread the supporting paper with its observing side facing out to the back of the artwork with coir brush. Bubbles can be removed by tapping the brush. Apply paste to the edge of supporting paper, place a paper loop on the edge, and take the laminate to paper board.

- Framing with silk. 1. Spread silk out with the observing side facing down. Dampen the silk to stretch warp and weft threads straight. Give an even coat of semi-thin past to the silk. The supporting paper for silk should be white and clean. Spread the supporting paper right side facing down over the silk with a coir brush. Take the supported silk to paper board to dry. 2. Trim the supported artwork square, starting from narrowest margin. 3. Cut 3/8 inch spacer strips that will join silk and artwork from a supported colored rice paper. With the artwork facing down, glue 1/3 of the spacers to the back of art work, starting from sides. 4. The proportion of upper and lower pieces should be 6 : 4. Cut the supported silk with patterns in the same direction, allowing one inch beyond actual size. With the artwork facing up, glue silk pieces to the spacers, starting from the sides, giving 1/16 inch space between the artwork and the silk. 5. Trim the scroll square. 6. Cut 1/4 inch border strips from a colored paper. Apply paste to the strips and wrap them evenly along the edges of the scroll, starting from the face.
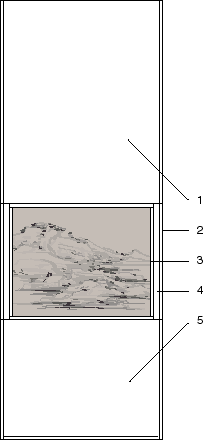
1. Upper piece
2. Border
3. Spacer
4. Side pieces
5. Lower piece
- Backing. 1. With the scroll facing up, fold lower piece a fast pleat at 2 inches from the lower edge with a steel rule. Fold upper piece a fast pleat at 3/4 inch from the upper edge the same way. These are hanging bar sleeves. 2. Turn the scroll over. Glue a 6-inch paper strip, the same width of the scroll, to the lower hanging bar pleat and a 2 1/2 strip to the upper hanging bar pleat. These are hanging bar wrappers. 3. Making a backing by laminating two sheets of papers that are large enough to extend 1 and 1/4 inches beyond actual scroll size, including wrappers. 4. Place the scroll facing down over the wet laminate and lightly sprinkle it with water, including paper wrappers. Turn the scroll over and loosely roll it up from the bottom. 5. Give an even coat of thin paste to the backing. Unfurl the moistened scroll over and gently press it down with a clean, dry bristle brush. Turn the scroll over with the backing. Sweep with a coir brush lengthwise to firmly cement them together. 6. Paste an inch wide strip of patterned paper of to the upper right corner of the scroll as name tag. Paste a silk strip at both sides across where the lower sleeve and wrapper overlaps. Leave the scroll on paper board at least seven days.
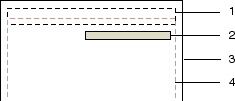
1. Upper bar wrapper
2. Name tag
3. Backing
4. Silk
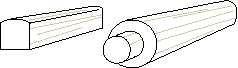
- Mounting hanging bars. 1. With the scroll facing down and a smooth sheet of paper underneath, rub across the scroll with a wax stick and then a cobblestone of palm size, starting from the top. 2. Trim the backing even with borders. 3. The upper hanging bar is a 1/2 inch square wooden slat exactly the width of the scroll with a slight arch at the top to receive tying ribbon. The upper hanging bar usually has four rings which are made by cutting 32 gauge copper wire 2 1/2 inches long, looping it around a nail and pinching it in the shape of a cotter pin. The inner rings take about 2/5 of the length; the outer rings take about 3/5 of the ends. Drill holes through the side of the slat and fix the rings in place. Wrap the ends with supported silk. 4. The lower hanging bar is a 1 1/2 inch round dowel exactly the width of the scroll, excluding dowel joints. Wrap the ends with supported silk and assemble the caps with Elmer's glue. 5. With the scroll facing down, fold the upper wrapper back. Align the slat at the seam with rings facing up. Wrap the wrapper one full turn around the slat, letting the rings pierce through. Take upper bar off. Apply paste to entire upper sleeve and the edge of the wrapper. Replace the slat and tightly wrap the wrapper and then the sleeve around it. 6. With the scroll facing up, fold the lower sleeve back. Paste a 1/2 inch wide silk strip to both end of the seam as reinforcement. Apply paste to the edge of the sleeve and the wrapper. Place and align the dowel at the seam and roll it outward till it is over the edge of paper wrapper. Wrap the wrapper. Roll the dowel back till it is over the upper sleeve. Wrap the sleeve. 7. Pass a hanging cord through the rings and tie a reef-knot on either outer ring. Bind the end to the cord with a silk strip. Tie a soft ribbon to hanging cord.

| Rice paper uses |
|
Calligraphy Mounting Painting Relief Printing Rubbing Western Art Kite Paper Cut Lantern Surfboard Window Covering |