Rice Paper
Contact
Home

Relief Printing
Relief printing is the oldest form of printmaking. The most common form of relief printing is woodcut. An ink drawing is made on a wood block. The artist cuts away uninked areas, leaving inked areas raised. Printing ink is applied to the raised surface and a sheet of paper is laid on the block to take an impression by hand or a press.
Woodcut printing on paper was first adopted in the seventh century China, where drawing and text were reproduces on the same block. A hundred years after paper reached Europe, the use of woodcut in the development of printing was established in the late fourteenth century Germany. Albrecht Durer explored the technique of the medium of woodcut, elevating it as an independent form of art, not only a way of printing text. Hundreds years later in 1905 a handful of German painters formed themselves into a revolutionary group, The Bridge. One of the group's most successful ventures was the revitalization of woodcut. They produced a great deal of woodcut of originality, from which modern relief printing began.
Equipment
- Wood block
Wood suitable for relief printing can come from a number of trees, including pear, jujube, cherry (favored by the Japanese), apple, plum, beech, chestnut and maple. These trees are hard enough to enable fine details to be cut. Soft wood such as poplar or lime may also be called into service if large areas need to be cut away. Smooth the block surface with sandpaper before use.
Plywood has a very different feel to any plankwood used for woodcut. It does not stand for fine details, but is very responsive to the cutting tools, which can be used as sketching instruments. There are several kinds of plywood. Choose, if possible, linden wood which is less splintery.
Apart from wood, many other materials can be used as the block or plate. Linoleum has a similar effect to those of woodcut, but with a thick, sluggish feel. A smooth bed of plaster can be incised. Plastic sheet has a smooth surface, producing an uniform tone. Cardboard can be cut into various shapes, glued to a panel, and then relief printed. Poly tiles are easy to incise and take ink well. Potato prints are popular. Even stone and metal can be incised.
- Cutting tools
There are two main tools in woodcut to scoop out sections of wood, the curved gouge and the v-tool. The gouge makes broad cuts which are recognizable on a print for the round beginning of each stroke as the tool enters the wood. The v-tool hakes narrow cut which are recognizable for the sharp beginning of each stroke. On plankwood these tools can be used along and across wood grain; on plywood they produce smooth cuts following the grains. Other frequently used tools are the flat chisel and the knife. Chisels are used to remove large areas; knifes are used to cut along the shape of the image for a delicate result.
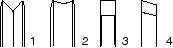
1. v-tool 2. gouge 3. chisel 4. knife cutter
- Ink
- Rice paper
- Burnisher or baren
Baren has been Eastern printmaker's press. Here is a simple baren to make. Prepare a disk about 4 inches in diameter. The disk was traditionally made of layers of rice paper that were glued together, but you can make it by cutting from plywood or strong paper board which is then coated with polyurethane. Apply Elmer's glue to one side of the disk, coiling up cotton cord over entire surface tightly, working from edge towards center. Chose a bamboo sheath about four inches wide and soak it in cool water overnight. Wrap the wet bamboo sheath over the corded side of the disk and twist both ends to form a loop handle which should fit a human hand comfortably. Tie the handle with cotton cord.
How to
- Prepare a drawing the same size of the wood block. Lay onion skin paper on the drawing and trace the outline of the drawing with pencil, keeping the stack undisturbed throughout. Turn the onion skin paper over and tape it to the block. Slide a carbon paper underneath and trace the pencil lines from the back of onion skin paper to transfer the design to the block. Because the carbon color is not reliable, fix the design with ink. Tint entire block with an oil color, which helps to tell the working of cutting tools when wood is cut away.
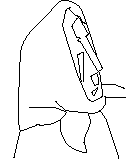
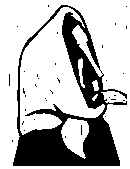
- Start cutting from main images. The cut areas must be clean enough, for burrs catch unwanted ink. Woodcut produces images by scooping sections of wood off bit by bit. How the subtraction is performed is what woodcut technique based upon. The illustration here is simple, more wood around the figure being removed by gouges to free the figure from the ground. At the finish give the block a light coat of ink for a preview. If adjustment is needed, wipe the block clean with a strip of soft rice paper before continue. Be aware that any cutting mark is a final decision.
- Cut the paper at least one inch beyond the edges of the block, interleaving them with damp newsprint before printing.
- Wash the wood block clean and cover it with a damp towel for several hours to allow the moisture to penetrate, which slows the drying time of printing ink.
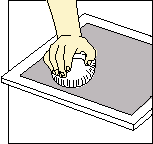
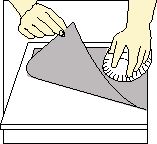
- Apply liquid ink to the block with a broad, soft brush. The gradation is achieved by diluting the pigment with water. While the ink is still fresh, quickly apply the moistened rice paper over the woodblock, one end down first. Give the back of the paper a gentle rub by a bamboo baren. Because rice paper has little capacity for extra water, the moisture of both block and paper is crucial. Either the paper or the block is too wet, ink bleeds.
Lift the print carefully.
| Rice Paper |
|
About History Fiber Production Make Your Own Sizing |
| Uses |
|
Calligraphy Mounting Painting Relief Printing Rubbing Western Art Kite Paper Cut Lantern Surfboard Window Covering |